I hope everyone is well and looking forward to a relaxing weekend. This blog is now a little over a year & half old and I've decided to do something I should really have been doing all along. I have to admit that the tech side of blogging still scares me, it really does. Everything I've done with my blog I've had to figure out as I went along and I still have so, so much to learn :)
Well, a few days ago, I wanted to help a blogging friend add share buttons but I realized I couldn't really remember clearly how I'd done it! So, dear ones, I decided to do something I've done a few times over the years. When starting jobs, at college, in various situations, whenever I've had things to learn/memorize, I have kept a notebook (I love, love, love notebooks!) When I started my current job I had lots of (so many) codes to memorize, so I started a little notebook and each time I found something new I had to learn, I jotted it down in the notebook, making a tiny "training manual" for myself. Of course as time goes on, the notebook will no longer be needed but I've always found it a great way of learning anything.
To that end, I've decided to go right back to the beginning and re-trace my steps in setting up this blog. I've started a new notebook and I'm going to go back to the beginning and hopefully conquer my fear of the technical side of blogging and learn as I go. Wanna come along?
OK, so you've started your blog, you've written your first post and you hope it will be read, that the reader will like it and want to share it. In order for that to happen, you have to make it easy for it to be shared. Which brings us to buttons....
Setting up Blogger's own share buttons is, as I've found out by re-tracing my steps, really easy. It really is a couple of steps and clicks. Bloggers own buttons are quite limited though but we'll get to that later. First though, lets set up some share buttons and get that lovely post shared.
First from the very top banner on your blog you'll see at the top right hand side of the screen, this....
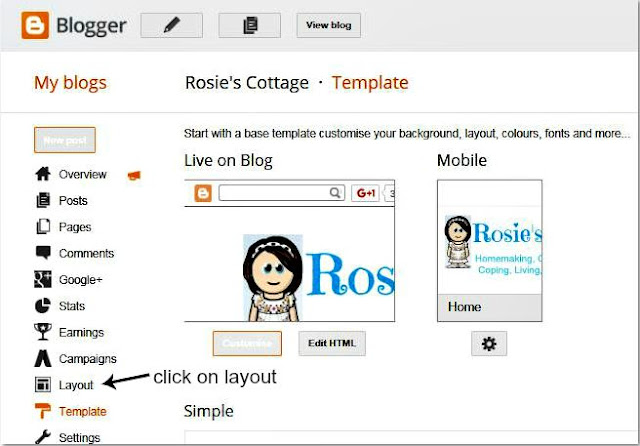
You'll see a "design" option. Click on this honeys. This will open the blogger template page....
On the template page, look for the layout option and click on it. This will take you to your blogs layout page. Once there, look for the "main" box, that is to say the area into which you type your blog post.
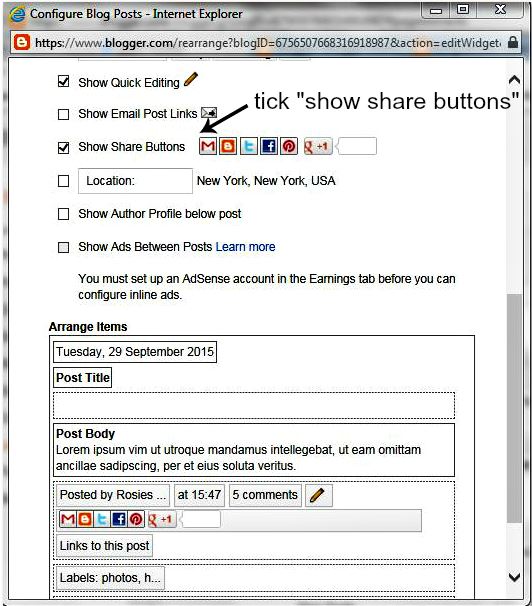
In this box you'll see, at the bottom right hand side, the edit option, click on this. This will allow you access to the "configure blog posts" widget, a popup box which looks like this.....
This widget has lots of useful options which will alter how your blog looks. For example you can tick boxes which will show labels under your post and also whether you want the date to appear etc. If you scroll down through these widget options you will see an option to "show share buttons."
Click on this option honeys. Once you've done this, scroll down to the bottom of the widget and click on the "save" button. This will close the widget again. Once this happens, scroll back up to the top of the layout page and click on the "save arrangement" button.
The share buttons from Blogger will now appear underneath each of your blog posts :) Wasn't that easy? I can't even begin to tell you how terrified I was at the beginning of doing this :) Honestly honeys, I was so scared that the internet would eat my blog and all of my work would just disappear!
Of course this is why it's so important to always, always, always have back ups of your work. I do this using Microsoft Word, more about that in a later post. As I said at the beginning of this post, Blogger's own buttons, while very useful, are limited in that you can't choose which social media platforms your post can be shared to, nor can you add additional options such as Stumbleupon. I later added additional buttons through the "share this" app, which I still have to go back and edit. I will figure this out and that will be the next post in this series :)
I hope that this has helped a little as a starting point at least, honeys. I am determined to get this tech stuff figured out and I'm going to do it one step at a time, editing my blog as I go. I hope you can join me on the journey :) I'm not changing the focus of my blog honeys, organizing our home and sharing recipes, printables and all of the other things I've been doing will still be here because I'm still doing them :) This is just another area of interest that I hope will help anyone who is as scared of tech as I am :) Till next time dear ones, have a fabulous weekend. Have fun, smile lots and hug even more. Sending heaps of huggles xx


2 comments:
Rosie! This was incredible! I can't believe how easy it was! Your steps were so SO helpful. It wasn't nearly as intimidating as I had previously mentioned. Tech stuff intimidates me SO MUCH especially since everyone expects that I should know this stuff at my age but I really hate it and it stresses me to no end. This was not stressful at all! I can't believe all I had to do was turn on my "show share buttons" ! :) You're the best!!! Thank you so much! oxoxoxo
So amazed!!!!
Hi Heather :) I'm so, so glad you have your share buttons! Now I can share your blog posts so much easier! yaaay! Have a fabulous weekend full of smiles angel :) huggles always xx
Post a Comment